• Welcome!
  • Contact
    • Facebook
    • Instagram
    • Pinterest
    • Twitter
    • YouTube

Whole Lifestyle Nutrition

Organic Recipes & Holistic Recipes

  • About
  • My Books
    • Natural Solutions for Cleaning and Wellness
    • Gluten Free & Grain Free Breads, Batters, & Doughs
  • Work With Me
    • One-On-One Coaching
    • 28-Day Healing Challenge
    • Toxic-Free Secrets Master Class
  • Limitless Freedom Method
  • Nutrition
    • Recipes
      • Recipes
      • Meal Plans
    • Health & Lifestyle
      • Healing
      • Challenges
        • 28-Day Healing Challenge
        • 30-Day Dumbbell Challenge
    • Natural Solutions
      • Health Remedies
      • Home Remedies
      • Natural Solutions Resource Page

Food Photography & Blogging Tips Health & Lifestyle

Behind The Scenes ~ How To Use Artificial Light In Food Photography

How To Use Artificial Light In Food Photography | WholeLifestyleNutrition.com

Oh Those Dreaded Winter Months


So let me hear it?  Is it winter time in your neck of the woods?  Here is Wisconsin, the grey skies have returned and will stay for the next 6 months.

If that wasn’t bad enough, it gets dark at 4:30 PM here!  I know, how am I ever going to get that natural light that is so needed when shooting good, quality food pictures?

There is a way, and today I am going to show you how to use artificial light in food photography!

Choosing The Right Artificial Light


First, lets talk artificial light shall we?  It is important to understand that not all artificial light is created equal!  I am going to say that again, because it is that important!  Not all artificial light is created equal!

Different lighting units give off different light.

  • Lets use a standard living room lamp as an example.  The light produced from this standard lamp will give a picture an unnatural look and will most likely create an orange hue and harsh shadows.
  • A halogen light in low wattage, purchased at a home improvement store, might seem like a solution but the light is typically to bright and again, really creates harsh shadows and a color that does not mimic natural light.
  • Kitchen lights are usually dreadful for shooting pictures.  They are not meant for shooting quality images they are meant for cooking!
  • I have to tell you, I purchased an expensive lighting unit from my camera shop locally that is on a stand and has a diffuser but I really was disappointed.  It wasn’t capturing the images the way I wanted to.

It wasn’t until I started using this artificial lighting unit that I became excited about shooting images in the winter months.  I mean really, who would of thought you could take images like this one, right?

How To Use Artificial Light In Food Photography | WholeLifestyleNutrition.com

Buying An Artificial Lighting Unit


So here is the lighting unit that I use!  First let me start by saying that I AM IN LOVE WITH THIS LIGHTING UNIT!  Yah, I know it is in bold and all caps, but you need to know that I am screaming that at the top of my lungs because this is something you Just.Have.To.Have!! 😉

So here is the lighting unit that I use:

Lowel EGO Digital Imaging, Tabletop Fluorescent Light Unit

I love this unit for several reasons.

  • It is a tabletop unit which is perfect for food photography
  • The light bulbs for this unit are specifically made for photography
  • The shadows are very minimal and it creates quality images
  • Its affordable and small enough to store easily

How To Use Artificial Light In Food Photography


So lets get down to how we use artificial light in food photography shall we?  Lets take a look at this image again.

How To Use Artificial Light In Food Photography | WholeLifestyleNutrition.com

My first preference when using my artificial light unit is to use white for everything!  White allows the light to bounce off of other things and you have more control of your light.  Controlling light means controlling harsh shadows.

When shooting with artificial light, shadows and harsh light become the pressing issues.  Here is how I solve them:

  • Place the lighting unit right on your table top.  Don’t worry you will be diffusing the light so it isn’t harsh.
  • Place a white under t-shirt over the light to diffuse the light more (of course don’t leave this on for a long period of time)
  • Place your food on a white table top unit (learn how to make your own here)
  • Use a white bounce board (comes with the artificial light unit I recommend)
  • Use a white backdrop (you can learn how to set up a studio for under $10 here)
  • Use white plates.  It is okay to use a splash of color with a napkin or cloth as pictured above.
  • Make sure you have NO lights on in the room other then the artificial light unit!  No overhead light, nothing. In fact, a darker room is preferred.  I shot these images in my basement with no lights on and it was completely dark outside.


Shooting In Manual Mode


Now once you have all this set up, start shooting your images.  It helps if you are in manual mode when shooting these images because you have more control of the light.  You can learn how to shoot in manual mode here.

One other reason I like all white is because you can edit your shadows out of your images by editing the exposure or by adjusting the shadows.  You can learn more about editing in this post: Simple editing techniques that can dramatically improve you photos.

I know it might be hard to imagine a photo from the picture shown above, but when you zoom in to take a picture, all the behind the scenes images disappear and you get an image that looks something like this.

How To Use Artificial Light In Food Photography | WholeLifestyleNutrition.com

Here is one more image shot in another photo shoot using all white and artificial light.

How To Use Artificial Light In Food Photography | WholeLifestyleNutrition.com

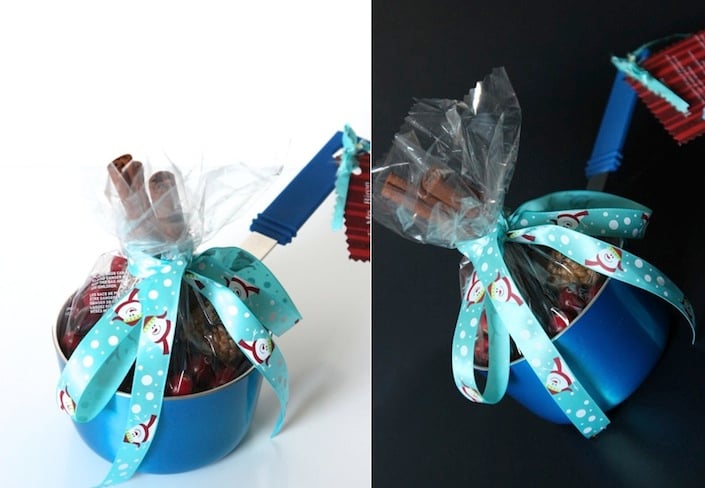
Shooting Images With Black Backgrounds


I know I am really focusing on white, white white…but it is possible to also shoot images with dark backgrounds.

There are some pros and cons though.

  • Pro ~ there are no harsh shadows Con ~ There is harsh light
  • Pro ~ the harsh light can be cropped out Con ~ You will have more editing to do to get your final image
  • Pro ~ black backgrounds create dramatic pictures Con~ You are a bit limited on controlling light

So lets look at this image.  You can clearly tell that the lighting unit is on the left.  The light is a bit more harsh and the shadows show up within the props.

How To Use Artificial Light In Food Photography | WholeLifestyleNutrition.com

To control this you can simple design the picture to be cropped and crop out some of the harsh light.  Do you see how that was accomplished in this picture?

How To Use Artificial Light In Food Photography | WholeLifestyleNutrition.com

Practice, Practice, Practice!


Bottom line, you have to get a feel for the mood you are trying to portray to your audience.  Every image is different and will work differently with artificial light.

Get some practice and play around with artificial light.  It is totally different then shooting in natural light.

I can shoot an entire photo shoot in natural light in less then 20 images.  But when I am using artificial light, I shoot closer to 100 images.  Why?  Well simply put, I am still getting the hang of it!

Practice, practice, practice…you will get better the more you use artificial light!

How To Use Artificial Light In Food Photography | WholeLifestyleNutrition.com

Camera Details


As always, I like to include the details of my pictures.  As usual, I shot all of these pictures on manual mode.  You can learn how to use manual mode in this tutorial: Learn How To Use Manual Mode On Your DSLR Camera With This Easy Photography Tutorial.  I used artificial light for all of these images.  I did not use a tripod for any of these photos.

  • The pictures of the 3 cookies stacked on each other has an ISO of 800, the aperture was f/4.5 and the shutter speed was 1/250.
  • The picture of the cookies with the turquoise checkered fabric has an Iso of 800, the aperture was f/4.5 and the shutter speed was 1/160
  • The pictures with the black backgrounds were shot with an ISO of 800, the aperture was f/8 and shutter speed was 1/15.
  • The final picture, the picture on the left was shot ISO 800, aperture f/4.5 and shutter speed 1/40 and the image on the right was shot ISO 800, aperture f/3.2 and shutter speed 1/40.

I edited the pictures slightly by adjusting the exposure a bit, bumping up the saturation in the photos a bit.  If you should have any questions about any of these elements, please feel free to ask in the comment sections below.

More Great Photography Post ~ Photography, Equipment, Props & More


You can view more great photography post, in our Entire Series of Food Photography, Equipment, Props & More!   Until next week…

Oh and one more thing, check out this awesome tasty food photography book.  It is hands down my favorite photography book!!

 Want To Learn Even More About Food Photography

Tasty Food Photography eBookHere is one of my favorite e-books that really dives into a lot of great stuff. Lindsey over at Pinch of Yum has the most gorgeous photos!  In this e-book, she has tackles technical tips, composition tips, lighting tips, prop and set up tips, editing tips and general workflow tips.  There are instructional videos to easily walk you through learning the whole process!  Wether you are brand new to photography or have experience…this book is for everyone! Learn more here!


  • Share 0
  • Pin it 0


32 Comments

Halle Cottis/Whole Lifestyle Nutrition is a participant in the Amazon Services LLC Associates Program, an affiliate advertising program designed to provide a means for us to earn fees by linking to Amazon.com and affiliated sites.

« A Closer Look Into The GMO Debate!
Homemade Simmering Stovetop Potpourri Holiday Edition {A Great Holiday Gift}! »

Comments

  1. tessadomesticdiva says

    November 24, 2013 at 8:02 am

    I use the same light and love it too! Good idea on t- shirt trick, without the proper gadgets…diffusing in one hand and shooting in the other is a pain! Changing the color of the bounce board also changes the light subtly too…..

    Reply
  2. hallecottis says

    November 24, 2013 at 10:04 am

    tessadomesticdiva never even thought about changing out the bounce board, will have to try.  I love my unit and can’t imagine taking pictures without it in the winter months.  Sure natural is best, but this is the next best thing 😉

    Reply
  3. mikezielonka says

    November 25, 2013 at 11:00 am

    I am shocked that you use a white t-shirt. 🙂

    Reply
  4. Halle Cottis says

    December 8, 2013 at 9:16 am

    It makes all the difference in the world Mike!!

    Reply
  5. Mummy's Fast & Easy says

    October 26, 2014 at 11:36 am

    This is such a helpful article!
    Thanks a lot, Halle!

    Reply
  6. The Blonde Chef says

    November 5, 2014 at 8:38 am

    I just shot with my EGO light for the first time yesterday and was so pleased with the result! Glad I stumbled upon your article! Awesome tips!

    Reply
    • Halle Cottis says

      November 5, 2014 at 2:44 pm

      So happy to hear! Would love to see a photo when you get one done 🙂

      Reply
  7. Kayley says

    November 6, 2014 at 9:08 pm

    Awesome article, and gorgeous pictures!
    I’ve been in need of my first artificial light source and your post definitely helped me out.

    Curious as to what lens(es) you’re using? Especially in the cookie and stew images.

    Thanks a bunch for posting!

    Reply
    • Halle Cottis says

      November 11, 2014 at 9:00 am

      I use a this lens 95% of the time and I LOVE it!! http://www.amazon.com/dp/B002LVUIXA/?tag=wholelifesn0f-20

      Reply
  8. Amanda says

    November 20, 2014 at 7:08 am

    Thanks so much for this article! I am a new food blogger and every tip helps 🙂 especially since it’s pitch black outside by the time I get home from work. Have a wonderful day! xx

    Reply
  9. Susan says

    December 2, 2014 at 8:21 am

    Great article! Beautiful images! Is this light sturdy enough to take to restaurants to photograph their food? How big and heavy is it? Thanks!

    Reply
    • Halle Cottis says

      December 4, 2014 at 8:16 pm

      It is a tabletop unit and could easily be lugged into a restaurant. Be careful with the light bulbs, they are expensive…so pay close attention to not breaking them 🙂

      Reply
  10. Shakti says

    August 29, 2016 at 7:28 am

    Hi,
    Nice tips and love the photos you shot. I am going to try this right now and see. Will let you know. Thank you.

    Shakti

    Reply
    • Halle Cottis says

      August 30, 2016 at 7:25 am

      Glad you found this information useful. Good luck!

      Reply
  11. Andrea says

    October 26, 2017 at 9:14 am

    THANK YOU for this amazing , complete and friendly post. VERY useful!!!

    Reply
  12. Marilou says

    November 29, 2017 at 6:42 pm

    Very helpful, it definitely helped me decide to buy the Lowel EGO Digital Imaging, Tabletop Fluorescent Light Unit. It seems a lot of food bloggers are using this and seems to be happy with it.

    Reply
  13. Lisa says

    July 15, 2018 at 11:11 pm

    Such a great post – Thank you so much for sharing. It helps so much. So we need to take the room we photograph in using this setup have to be completely dark?

    Reply
  14. Olivia Lily says

    July 23, 2018 at 1:31 am

    Gathered lot of informative resources from your blog. Hope i will help me to go far in the photography world. I just would like to say thanks for your great efforts. I appreciate your excellent post. Hope for the best.

    Reply
  15. Brittany says

    October 21, 2018 at 2:44 pm

    Hi, the lighting system you suggested is no longer available! Do you have any other suggestions?

    Reply
  16. yogita says

    October 29, 2018 at 5:02 am

    Its great to see and learn from this post Thanks

    Reply
  17. Melody says

    April 30, 2019 at 11:47 am

    Thanks for sharing such great tips! I was just wondering if you use a different light now? I tried to buy the one you recommended, but it’s no longer available on Amazon. I don’t see anything really similar looking either. I would love to know what your suggestion might be. Thanks so much!

    Reply
  18. Asif Mujtoba says

    September 22, 2019 at 12:30 pm

    Such essential tips for food photographers. A great way for food photography. Thanks

    Reply
  19. Asif Mujtoba says

    September 22, 2019 at 12:34 pm

    Such essential tips for food photographers. A great way for food photography. Thanks

    Reply
  20. James Darren says

    November 2, 2019 at 3:02 am

    Nicely explained, thanks

    Reply
  21. Rishikes sarker says

    November 20, 2019 at 3:04 am

    I am grateful to the owner of this site which really shares this wonderful work of this site. That is actually great and useful information. I’m satisfied with just sharing this useful information with us. Please keep it up to date like this. Thank you for sharing.

    Reply
  22. cutoutstudiouk says

    March 7, 2020 at 10:32 pm

    This is one of the great blog posts. I like your writing style. I appreciate your efforts. Keep posting some more interesting blog posts.

    Reply
  23. Emily Anderson says

    March 12, 2020 at 2:16 am

    Very good explanation about the artificial light in food photography. Thanks for sharing this tutorial with us. I am a professional graphic designer. I have a blog something like yours. Visit here product photography for ecommerce

    Reply
    • Dave TEF says

      January 13, 2021 at 5:55 am

      I saw your product photography, it was beautiful too.

      Reply
  24. Roy says

    April 16, 2020 at 7:37 am

    Thank You for your great Article.It is the clearest I’ve found and i am sure it’s going to help me in my effort to learn.
    I look forward to reading more from to you.

    Reply
  25. clippingpathlab says

    October 19, 2020 at 11:06 pm

    This best great helpful website! I know, how am I ever going to get that natural light.

    Reply
  26. Akash says

    December 17, 2020 at 4:50 am

    very informative post…thank you..

    Reply
  27. Dave TEF says

    January 13, 2021 at 5:50 am

    The photography was very beautiful but I liked the direction of his picture.

    Reply

Leave a Reply Cancel reply

Your email address will not be published. Required fields are marked *

This site uses Akismet to reduce spam. Learn how your comment data is processed.

small head shotWelcome! I'm Halle Cottis.

I'm on a mission to liberate women who are not living true to themselves to walk into life being EXACTLY who they were meant to be. I believe that women should put themselves first. When you choose yourself today, amazing things can happen.  I'm glad you're here! ❤Learn More →

Limitless Freedom Method

Subscribe Today

Subscribe To The Limitless Freedom Method Newsletter

* indicates required

Grab Natural Solutions for Cleaning & Wellness!

natural-solutions-book-copy-2

Trending Posts

When The Tide Turns | WholeLifestyleNutrition.com

When The Tide Turns

What is kombucha and why it is so healthy for you! | WholeLifestyleNutrition.com

What Is Kombucha & Why Is It So Healthy For You {Part 1}

A revolutionary way to experience total freemdom

The Limitless Freedom Method

Principle #1 – How To Start Showing Up For Yourself

Paleo, Gluten Free, Grain Free Mini Muffins {2 Versions}

  • Terms of Service
  • Privacy Policy
  • Disclaimer

Copyright © 2021 · Whole Lifestyle Nutrition

Copyright © 2021 · Whole Lifestyle Nutrition on Genesis Framework · WordPress · Log in